Still on the topic of pre-lessons. Remember that there are four basic steps in pre-lessons:

1. calming oneself
2. deep and slow breathing
3. positive statements/suggestions
4. image training/image play

In the next few posts, I will talk about image training.

Image training is the most important thing in right brain education, because visualisation is fundamental to all aspects of right brain training, eg. Senses Play (ESP games), mental calculation, speed reading and photographic memory. Image training trains the children to visualise and to represent something mentally, and to capture and hold that image. A child or adult who can visualise with perfect representation an object from the physical environment and who can mentally change this image at will has perfected this function.

For adults, there are many ways to do image training. Professor Shichida talks about training using actions, training using audiotapes, ESP games (after visualization), dream control method, life energy training (‘kiko’), aura viewing training, use of paramemory, sun viewing method, image training with candles (like Henry Sugar!) and "after image" training.

Let me explain "after image" training. This exercise is for the parents and for older children (4 years and above). Shichida encourages parents to develop their right brain so that they can influence their children via "the radar effect". Shichida says that, if there is a child who is able to perform computer-like calculations, or has demonstrated telepathic abilities, etc., it has been found that the children around him are also able to do similar things. If you bring a child who has not been able to demonstrate any of these abilities into the group, that child will soon be able to do similar things as the rest of the group. This effect is called “the radar effect”.

Ok, this "after image" exercise uses an orange card with a small blue circle in the centre. All Shichida parents are issued this card at the Parents Education seminar. You can use other images too, once you understand how it is done.


Breathe deeply, relax your mind, and stare at the blue circle for 30 seconds. Then, close your eyes and you will see the "after image". If it disappears just tell yourself, “It will reappear.” And it will. Initially, the "after image" will be in opposite colours, that is, the blue circle will appear orange. With further practice, you will eventually be able to see the blue circle in its correct colour in your "after image". Continue practicing until you can CHANGE the colour and shape of your "after image", for instance, a red circle, then a green square. When you reach that stage, you should be able to see images spontaneously (you can see a free image). The objective is to see yourself in an image. Then you can visualise yourself getting a hole in one in golf!

For children, Professor Shichida recommends the following games for image training:
1) Return to the womb;
2) Become a teeny tiny person;
3) Pretend play;
4) Imaginary story;
5) Stick image; and
6) Orange card image training.

The ones we use more often are (1) stick image (basic image training), (2) pretend play, (3) imaginary story, and (4) orange card image training/"after image" training (for children who are four years old and above who can verbalise their thoughts). These are fun children’s games which involve imaging and visualisation. I will explain these in the next instalment.

Saturday, September 24, 2011

Notes on Shichida - Part 10: Pre-lessons


We are going to rewind. Before you do Senses Play, you should do the pre-lessons. In class, pre-lessons are done at the start of the class (after the greeting and introduction), before Senses Play. Pre-lessons should be done at home too, at the start of the home practice session.

Pre-lessons are very important. They help the child to relax, to switch over to alpha wave and to focus on the session. There is little point in having the session if the child is not relaxed and in a good mood. The pre-lessons comprise (1) the energy ball game; (2) blowing game; (3) making positive statements and suggestions; and (4) image training. I will explain the first three in this post and image training in the next post.

Let me explain the energy ball game first. When adults try to relax and focus themselves on the task at hand, they usually close their eyes, breathe deeply and slowly, get rid of negative thoughts and think positive thoughts to motivate themselves. We tell ourselves, "Close your eyes, get rid of negative distracting thoughts, focus and tell yourself you can do it!" However, the young ones may not understand how to do all that. In order to help them, we play this game.

The game has two parts. First, we rub our hands together and pretend to gather good energy into a big ball, lift it high and let it shower down on us to wash away all the bad energy. Then, we rub our hands together and make another energy ball, but this time we pretend to pack the good energy tightly into a ball and pretend to eat it so that we are filled with good energy.

Here's a Youtube video of Ryan and me playing the game.


After the energy ball game, we give our children a big hug and tell them, "I love you." Make other positive statements like, "You and mummy are one in our hearts" and positive suggestions like, "We are going to have a lot of fun!"

I have heard comments from parents that the energy ball game seems unorthodox or spiritual or supernatural. Actually, it's not at all. It's just a game for the children to play along, to put them in a good frame of mind for the class and to concentrate. Now that I have explained the purpose of the activity, you can even modify it or do something else at home, according to what is suitable for your child. If your child can understand what to do - to breathe deeply, relax, focus and put himself in a positive frame of mind, then that achieves the purpose. Just make sure to tag on positive statements/suggestions and then do image training - these two are very important.

After the energy ball game and positive statements/suggestions, we do blowing games. As explained, adults can relax themselves by breathing slowly and deeply for a while and focusing their minds (meditating). For the younger children, they may not understand when you tell them to take slow and deep breaths or they may simply not know how. This activity helps the children to do deep breathing.

In class, we use blowing toys to play this game. I'll show you our homemade ones which are similar.

The first one is supposed to be an octopus! Just goes to show - don't worry that your handmade material looks unprofessional - it doesn't matter! Hahaha! Here, Ryan blows on the tentacles (the green tassels).


A jellyfish (don't worry, Ryan took some time to figure out what it was too). I wanted to re-do it but when I showed it to him, he started blowing on it, so I let it be. Heh heh.


A boat with a sail that you can blow on.


A bird on a perch. The bird swings when you blow on it. I cut the whole thing from one piece of paper.

Next one is a seal, spinning a ball on its nose. I made this by pasting two sides of the ball on a satay stick. The satay stick is inserted into part of a straw at the back of the seal. Hold the seal up, blow on the ball and watch it spin! This straw-stick model can be used for lots of things - an aeroplane with moving propellers, a sun/moon combination, a weather vane, etc.


This is what I did with the rest of that straw. I threaded a string through it and tied a button on one end to keep it in place. On the other end, I stuck a butterfly. Hold the straw, blow on the butterfly and watch it flutter! 


Again, this straw-string model can be used for anything - hang a small pom-pom, a kite, a bee, an aeroplane, a bird, etc. It can be a two-dimensional or a three-dimensional object. Anything that moves easily.

Here's a fly that you blow away from the watermelon slice. The fly is attached to a plastic strip that is also attached to the watermelon slice.

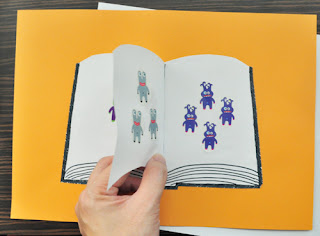
In the next example, I drew a book and cut a slot in the middle. I inserted a piece of paper into the slot to make a page and decorated the book with pictures of monsters which I cut from a piece of used gift wrap. Ryan has to blow the page upwards to see what's underneath!


Other examples - a dog with floppy ears that you can blow up, a helicopter with moving rotor blades, a house with a chimney or a train engine (use black strips of paper/plastic for smoke and blow on the strips), etc. You can even use something that doesn't move at all - like a picture of a hot apple pie. Actually, the examples are endless.

After the blowing game, we do image training (pretend play/imaginary story), then the "Which One?" games and then the "hot" card game.

At home, you must do the pre-lessons if your child is above three years old. If your child is under three years old, you can choose to skip the pre-lessons if your child is already happy and relaxed, as the right brain is usually still dominant at this age, although it is still better to do them. It depends on the situation and the individual child. If your child needs some help to focus, then the games will help. Also, some children may have already started receiving a lot of left brain input before they turn three (especially in Singapore) - these children may need more help to switch over. In class, we do the pre-lessons at all ages, even with the babies - some children may need it, some children may not but since we can't customise the class routine to fit the individual child, we just do it in every class. If your child attends the weekly class, it's also good to do the pre-lessons even if your child is under three, to maintain the routine.

Do blowing games at home if your child doesn't know how to do deep and slow breathing or if your child is particularly hyper. Please do not worry about making those little blowing toys that we use in class. In class we change the blowing toy every week but at home you can repeat the same thing in subsequent sessions. It's just something to help your child breathe deeply and relax himself. You can use a piece of tissue paper or a feather and blow it across the floor. You can use a handkerchief. You can even just hold up a picture of a hot cup of coffee and ask your child to blow on it. I would not suggest blowing bubbles or blowing a musical instrument or even a lighted candle - the child may get too excited and want to continue playing with the bubbles, etc.

After the pre-lessons (including image training which I will explain in the next post), you can proceed to Senses Play.

Monday, September 19, 2011

Good Night Gorilla by Peggy Rathmann

Written and illustrated by Peggy Rathmann, this book has won multiple awards including ALA Notable Children's Book for 1994, Bulletin Blue Ribbon 1994 and Horn Book Fanfare 1995 selection. Almost wordless, the story is told through the rich illustrations. An unobservant zookeeper is doing his nightly rounds when a cheeky gorilla steals his keys and lets the animals out. The animals all follow him home and the zookeeper's wife sorts everything out.

I asked Terri to buy a copy for us from overseas and since we received it, we have read it over and over again. The book is available locally but I was not in a hurry because I was afraid that it might be another "Goodnight Moon" and, at that time, I was not enamoured with Goodnight Moon (I've since become a firm fan). Comparing the two, they are both fantastic books, the difference is that Goodnight Moon is more sedate and quiet, while Good Night Gorilla takes you on a hilarious escapade.

When I first read the book with Ryan, Ryan would call out the names of the animals that he knew best - the gorilla (Ryan calls it the "gowawa"), the mouse, the elephant, the giraffe and the lion. After Richard started reading the book with him, they started a game of "Spot the banana" in each scene. This came about because Richard was so tickled at Ryan saying "nana!" so he kept pointing out the banana so that Ryan would say "nana!" over and over again. Now that Ryan is getting on with his speech and vocabulary, Richard points to each of the seven animals (including the hyena and the armadillo) and Ryan dutifully identifies each one in each scene.

This one's a keeper, for sure.


Friday, September 16, 2011

Matching letters to objects

Here's a Youtube video (about 7.5 minutes) of a game that Richard and Ryan have been playing.

The game is simple  - Richard shows a card with a picture of an object and Ryan selects the card with the letter corresponding to the first letter of the object's name. So, for a picture of a cat, Ryan selects the card with the letter "C". He connects the two cards (they are like jigsaw pieces) and arranges them neatly on the floor.


On the back of the cards is a set of capital and small letters (upper and lower case), eg. the capital "B" links up to the small "b". When we started playing with these cards, Ryan used them to match up the capital and small letters. It was only recently that Richard came up with the game in the video - this is the third or fourth time they are playing it. Ryan could match up all the cards the very first time they played this game.

The "hot" card game is easy to practise at home as it is very simple and requires very little preparation. In class, the "hot" card game is played straight after the "Which One?" games.

Present two cards of the same size and colour, about the size of your child's hand. On one card is the picture which you want him to find - this is the "hot" card. The other card is either blank or has a different picture. For example, one card has a picture of an aquarium with many fish and the other has a picture of an aquarium with just a few fish. Or one card has a picture of a hexagon and the other card is blank. Note that the blank card should never be the "hot" card. It doesn't have to be fancy, you can draw a simple picture or shape, you can use stickers or you can cut out a picture from a magazine. If you have the linking memory cards for two year olds, you can use those too.

For example, in the set in the photo below, the "hot" card can be the zebra. Show him both cards and tell him the zebra is "hot". Place the cards face down on the table and shuffle them around. Ask your child to rub his palms together and feel the cards by placing his palm on each of the cards. Ask him to find the "hot" card. You can do this a few times with the same set in the same session.


Ok, now back to "Which one?" games. In addition to the ones I showed you in Part 7 and Part 8, I wanted to show you three examples which are a bit more creative. These were done in class and from these, you can see that we don't always use paper scenes, and also that there are many ways to ask "Which One?". I hope these will give you more ideas to come up with different and creative games of your own at home. Remember that, for home practice, you don't have to rely on paper scenes that we use in class. You can use real objects instead.

Prepare a red and a green apple. Tell your child that the red one is sweet and juicy and the green one is sour. Hide one apple away. Ask your child to pretend to eat the apples and taste them. Then ask him to guess which apple has been hidden away. In class, this is done with a picture of a green apple and a picture of a red apple. One is hidden in an envelope with the word "taste" on it. Here, I'm showing you a picture of the apples with a paper bag but remember, you can use real fruit at home.


Next example - take three ribbons of different colours and connect them end-to-end to form a line. Put it all in a tissue box or a toilet paper tube and ask your child which colour will emerge from the box/tube first. After he makes his choice, pull the ribbon out to reveal the first colour. Then ask what's the next colour and after he makes his choice, pull the ribbon out to reveal the colour. Repeat for the last colour.


This last one is a little tricky to explain. I hope the photo helps. 


There are three snails with different coloured shells in the example. They are each paired up with a snail behind. Ask your child to find the pair with matching colours, eg. in this case, the green snail in front has a green snail behind it so this is the pair we want. Ryan did this in class recently (they did it with turtles). At home, you can do this with anything - you can use earrings or socks or crayons or Lego pieces, just hide one set under some cloth or behind a sheet of paper.


That's all for now. As always, keep it fun!

In this post, I will share a little about how we play Senses Play / ESP games in Shichida class. I will go through the "Which one?" games.

The "Which one?" games are only one part of Senses Play. I will touch on the rest of Senses Play in another post. There are also some preparatory exercises that we do at the start of Senses Play - these are to relax the mind, to switch to alpha wave frequency, and to focus the child's mind - I will also deal with that separately.

Ok, so as I mentioned in Part 7, the "Which one?" games in class are limited - we can't for example ask what the next day's weather is going to be or what time is daddy going to be home. Also, the exercise has to be quick because there can be up to 6 children in the class and each child has to give his answer before the answer is revealed.

So what we do in class is to use images on paper to create the scene. I'll show you some of our homemade ones, which are similar to the ones we have in class.

In this first example, I show Ryan the first two pictures - the picture of the boy without the hat and the picture of the three hats. I ask him, "Which hat will the boy wear?"


After Ryan makes his choice, I will show him the answer. Whether he gets it right or wrong, he will receive lots and lots of praise for his effort.


For children in the 2-3 years class, sometimes we give two choices, sometimes we give three. Sometimes four, but rarely. So in the next example, I show Ryan the picture of the cave and the picture of the fish and the crab. I ask, "Which one is hiding in the cave?"


After Ryan makes his choice, I reveal the answer and, whatever his choice was, I give him lots of praise for his effort.

Sometimes it may be hard for the child to understand what you are referring to, so we give a little direction - in this example, the relevant part is shown but blacked out. The question would be, "Who is driving the bus?" and you can point to the blacked out part.


Here's the answer! Remember - lots and lots of praise for effort!


Here's another example of giving some direction. The question here is, "What is hiding in the sea?". The part of the head showing above the surface of the water helps the child to understand what you are getting at.


It's an octopus! Lots of praise for effort please!


This one is for precognition (like the first example) - which lily pad will the frog land on?


The right one! Praise, praise, praise!

Hope you get the idea. Remember that you should practise everyday at home with your child and your child should be in a happy and relaxed frame of mind. You can play games like the ones I mentioned in Part 7 or you can make paper scenes like the ones in this post. If you use paper scenes, try not to repeat them because if you do, then it becomes a memory game rather than a game to strengthen the right brain's senses. Keep the images clear and simple - don't make your child pick out some obscure object in the corner of a picture filled with details.

Happy playing!

Subscribe to our feed

Followers

Brighter Planet's 350 Challenge